
onX Hunt Advanced Features
Anyone can make a basic elk call and sometimes we’ll even call in an elk. It’s one thing to make some basic elk sounds and have some success, but it’s something else entirely to deeply understand why, how, and when to call for different conditions and scenarios. It’s the same with onX Hunt. While you’re likely already using onX Hunt, you may not be using it to its full capability. To level up your onX Hunt game, check out our tips to take full advantage of some of its advanced features.
onX Hunt Waypoint Folders
If you’re an active multi-state, multi-species hunter, you’re likely creating a ton of waypoints and it might be getting unwieldy. Creating folders is an easy way to create a level of organization for your waypoints. Maybe you want to develop species-specific folders, or waypoints by year, or region. To use folders, simply open “My Content”, and select “+ New Folder” to create your folder.
Once you’ve created a folder, open your waypoint list and select the waypoints you want to add to your new folder. Another nice feature of folders is instead of having to share individual waypoints, you can select and share an entire folder. This is particularly handy if you have a new hunter joining you on a hunt.
Optimal Wind for Waypoints
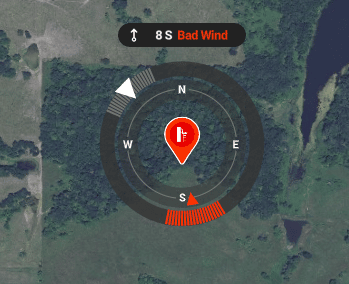
If you have multiple options for stand locations, you can now select the optimal wind for each stand. Simply open Waypoint Tools to select the optimal wind direction for each stand location.

Once you’ve established the ideal wind for each stand location, your ideal wind and the current wind will be displayed for each waypoint. This makes it easy to decide at a glance what stand you’re going to hunt that morning.
onX Hunt Advanced Features: The Layer Library
The layer library is where the magic happens with onX Hunt. Using layers, you can completely customize onX Hunt to your specific needs. A layer is essentially a set of specific data that overlay on your map. There are so many layers, and it seems like onX is adding more every day. We cannot cover all of them, but we’ll touch on a few ideas on how you can use layers to your advantage.
Use Trees, Crops, and Cover Layers to target hunt areas
The Trees, Crops, and Cover layer category offers multiple ways to zero in on hunt areas. We’ll cover two ideas. The first is the US Crop Distribution layer. With this layer, you can overlay and identify fields with 19 different crop types, (at this writing). Knowing there is a private land soybean field on the other side of a public wilderness area, may inform your stand location choice.
If you do not want to see all the crops available, you can simply select “Details” and turn off the crop layers you’re not interested in. Of note, the crop data is last year’s planting data, so take into account normal crop rotation in your area. What onX lists as a soybean field may be a corn field this year.
Two other layers in this category that I use in conjunction are Deciduous vs. Coniferous tree cover and Timber Cuts. While there are multiple ways that you can use these layers from elk to grouse hunting. I like to use these layers together to target likely Ruffed Grouse habitat by looking for roughly 5-15 year post timber harvest poplar stands that are close to coniferous cover.
Know where ATVs and UTVs can ride
ATVs and Side by Sides are exploding in popularity. While they are a ton of fun and certainly have hunting applications, there are also times when you’ll want to avoid them. onX can help with both scenarios. In the layer library under the category “Roads, Trails, and Rec”, I turn on “Motorized Roads and Trails.” First, it shows me where the trails are and where I can ride my ATV. There are also times when I’m hunting, I like to know where the ATV trails are so I can actively avoid them as I prefer grouse hunting in areas where motorized traffic is not allowed.
Using onX Hunt to Navigate
I still carry a compass on every hunt, but it’s become a backup that I rarely use anymore. With onX Hunt on my smartphone, my compass stays in my pocket and I use the app to check my location and direction of travel. To use this feature, click the “Location Button” on the bottom right corner of onX, (it looks like a scope crosshair). Tap it once to center the map on your current location. To find your direction of travel, tap it again to rotate the map in the direction you’re facing, you’ll see a little blue highlight showing your direction. I use this mode constantly while hunting in the mountains to keep my bearing.
Using onX Hunt Advanced Features – Final Thoughts
onX has changed the way I hunt more than any other tool. From navigating public and private boundaries out west to recording hundreds of waypoints and being able to easily find and share them, it’s been a game-changer. Change is a constant at onX and the web and app versions of the tool are constantly evolving for the better. To make the most of it, you’ll want to regularly explore onX for the latest features.
Note: HuntTested may receive a small commission if you purchase a product from the links on this page. This does NOT increase your price and helps to pay for the content you’re enjoying. HuntTested did receive consideration in coordination with this article. All opinions belong to HuntTested.
Related Content: Using onX Hunt on your Smartphone